Difference between revisions of "How To Upload ISOs On OpenNebula"
Jump to navigation
Jump to search
Client Admin (talk | contribs) |
|||
| (9 intermediate revisions by one other user not shown) | |||
| Line 1: | Line 1: | ||
[[Category:OpenNebula]] | [[Category:OpenNebula]] | ||
[[Category:How To]] | [[Category:How To]] | ||
[[Category:CloudInfrastructure]] | |||
__TOC__ | __TOC__ | ||
==Upload an ISO using an URL== | ==Upload an ISO using an URL== | ||
#[[OpenNebula_Administrative_Functions | Log into OpenNebula Sunstone]]. | #[[OpenNebula_Administrative_Functions | Log into OpenNebula Sunstone]]. | ||
#Go to | #Go to “Storage” in the left menu and click on “Images” in the drop down menu. | ||
#:[[File:Img_menu.png|thumb|none|upright=0.5]] | #:[[File:Img_menu.png|thumb|none|upright=0.5]] | ||
#:<br> | #:<br> | ||
| Line 12: | Line 14: | ||
#:The following parameters must be specified: | #:The following parameters must be specified: | ||
#:* Name = "your image name" | #:* Name = "your image name" | ||
#:* Type = | #:* Type = Readonly CD-ROM | ||
#:* Set Image Location to " | #:* Set Image Location to "Path in OpenNebula server" | ||
#:* Path = "The URL of the ISO image" | #:* Path = "The URL of the ISO image" | ||
#:<br> | #:<br> | ||
#Open "Advanced Options". | #Open "Advanced Options". | ||
#:[[File:New_img_advanced_options.png|thumb|none|upright=2]] | #:[[File:New_img_advanced_options.png|thumb|none|upright=2.5]] | ||
#:Fill in the following fields: | #:Fill in the following fields: | ||
#:* | #:* BUS = Parallel ATA (IDE) | ||
#:* | #:* Adjust "Image mapping driver" if required | ||
#:<br> | #:<br> | ||
#Click "Create" button. | #Click "Create" button. | ||
| Line 27: | Line 29: | ||
#[[OpenNebula_Administrative_Functions | Log into OpenNebula Sunstone]]. | #[[OpenNebula_Administrative_Functions | Log into OpenNebula Sunstone]]. | ||
#Go to | #Go to “Storage” in the left menu and click on “Images” in the drop down menu. | ||
#:[[File:Img_menu.png|thumb|none|upright=0.5]] | #:[[File:Img_menu.png|thumb|none|upright=0.5]] | ||
#:<br> | #:<br> | ||
| Line 34: | Line 36: | ||
#:The following parameters must be specified: | #:The following parameters must be specified: | ||
#:* Name = "your image name" | #:* Name = "your image name" | ||
#:* Type = | #:* Type = Readonly CD-ROM | ||
#:* Set Image Location to "Upload" | #:* Set Image Location to "Upload" | ||
#:* Click "Browse.." button and select the image on your local PC | #:* Click "Browse.." button and select the image on your local PC | ||
#:<br> | #:<br> | ||
#Open "Advanced Options". | #Open "Advanced Options". | ||
#:[[File:New_img_advanced_options.png|thumb|none|upright=2]] | #:[[File:New_img_advanced_options.png|thumb|none|upright=2.5]] | ||
#:Fill in the following fields: | #:Fill in the following fields: | ||
#:* | #:* BUS = Parallel ATA (IDE) | ||
#:* | #:* Adjust "Image mapping driver" if required | ||
#:<br> | #:<br> | ||
#Click "Create" button. | #Click "Create" button. | ||
Latest revision as of 22:13, 20 March 2017
Upload an ISO using an URL
- Log into OpenNebula Sunstone.
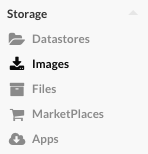
- Go to “Storage” in the left menu and click on “Images” in the drop down menu.
- Click on the "+" button to add a new image.
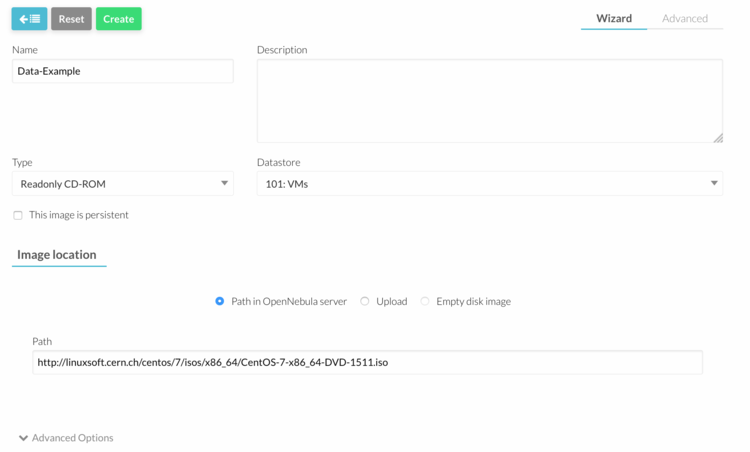
- The following parameters must be specified:
- Name = "your image name"
- Type = Readonly CD-ROM
- Set Image Location to "Path in OpenNebula server"
- Path = "The URL of the ISO image"
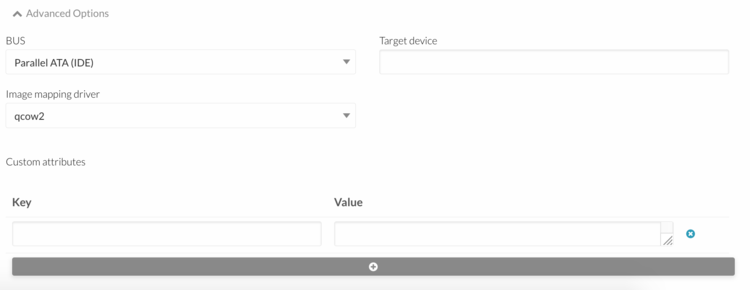
- Open "Advanced Options".
- Fill in the following fields:
- BUS = Parallel ATA (IDE)
- Adjust "Image mapping driver" if required
- Click "Create" button.
Upload a local ISO image
- Log into OpenNebula Sunstone.
- Go to “Storage” in the left menu and click on “Images” in the drop down menu.
- Click on the "+" button to add a new image.
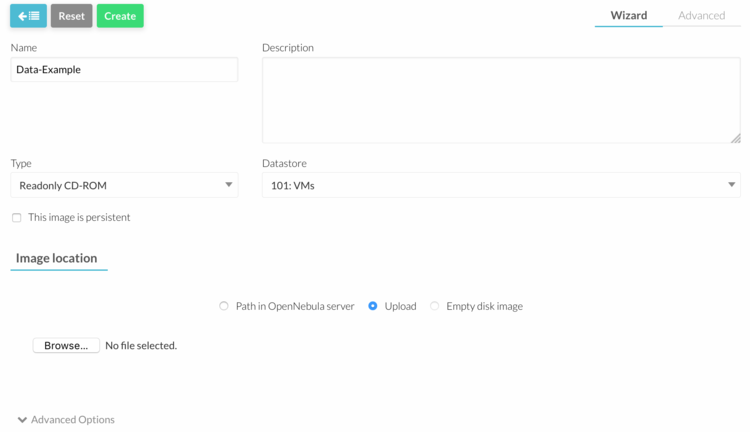
- The following parameters must be specified:
- Name = "your image name"
- Type = Readonly CD-ROM
- Set Image Location to "Upload"
- Click "Browse.." button and select the image on your local PC
- Open "Advanced Options".
- Fill in the following fields:
- BUS = Parallel ATA (IDE)
- Adjust "Image mapping driver" if required
- Click "Create" button.


