Difference between revisions of "OpenNebula Templates"
Jump to navigation
Jump to search
| (30 intermediate revisions by 4 users not shown) | |||
| Line 1: | Line 1: | ||
[[Category:OpenNebula]] | |||
[[Category:How To]] | |||
[[Category:CloudInfrastructure]] | |||
__TOC__ | __TOC__ | ||
==Create a new Template== | ==Create a new Template== | ||
#[[OpenNebula_Administrative_Functions | Log into OpenNebula Sunstone]]. | |||
#Go to “Templates” in the left menu and click on “VMs” in the drop down menu. | |||
#:[[File:Templates_menu.png|thumb|none|upright=0.5]] | |||
#:<br> | |||
#Click on the "+" button to create a new template. See below. | |||
#Click "Create" button. | |||
===Basic Template for Linux VMs=== | |||
== | |||
The basic procedure is as follows: | The basic procedure is as follows: | ||
* Add a template name in "General" menu. | * Add a template name in "General" menu. | ||
[[File:Template_name.png|thumb|none|upright=2]] | [[File:Template_name.png|thumb|none|upright=2]] | ||
* | * In "Storage" tab, choose a storage disk. If your template requires more disks, click on "Add another disk" and select it accordingly. | ||
[[File:Template_storage.png|thumb|none|upright=2.5]] | [[File:Template_storage.png|thumb|none|upright=2.5]] | ||
* | * In "Network" tab, select a Virtual Network, which the instantiated virtual machine(s) will be connected to. If your template requires more network interfaces, click on "Add another nic" and select it accordingly. | ||
[[File:Template_interface.png|thumb|none|upright=2.5]] | [[File:Template_interface.png|thumb|none|upright=2.5]] | ||
* If a fixed ip address is required, click on "Advanced Option" button and type the fixed address in the "IP" field. | |||
[[File:Template_adv_net_opt.png|thumb|none|upright=2.0]] | |||
| Line 32: | Line 35: | ||
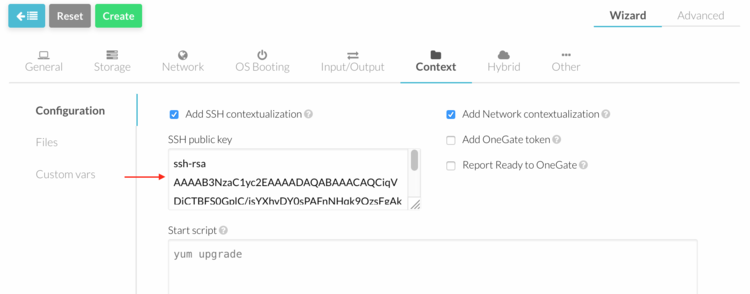
* In "Context" menu, add SSH keys and | * In "Context" menu, add SSH keys in the "Public Key" field and make sure that "Add SSH contextualization" and "Add Network contextualization" are ticked. | ||
[[File:Template_context.png|thumb|none|upright=2.5]] | [[File:Template_context.png|thumb|none|upright=2.5]] | ||
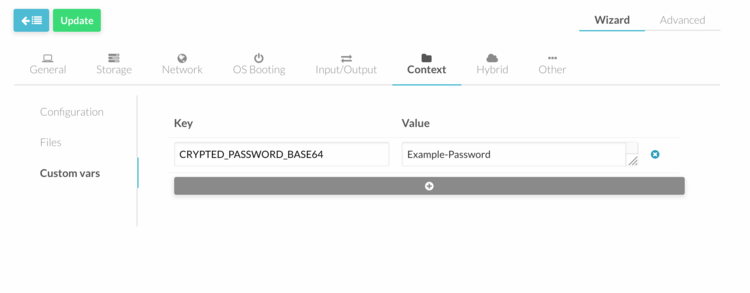
* In "Context" menu a root password | * In "Context" menu, you can define a root password under "Custom Vars". Add the following entries: KEY= CRYPTED_PASSWORD_BASE64, VALUE= "password" and press "Add" button. | ||
[[File:Template_rootpwd.png|thumb|none|upright=2.5]] | [[File:Template_rootpwd.png|thumb|none|upright=2.5]] | ||
The [[Contextualization_of_Linux_VMs|following page]] contains more information regarding the Context section. | |||
===Basic Template for Windows VMs=== | |||
The basic procedure is as follows: | |||
* Add a template name in "General" menu. | |||
[[File:Template_name.png|thumb|none|upright=2]] | |||
* In "Storage" tab, choose a storage disk. If your template requires more disks, click on "Add another disk" and select it accordingly. | |||
[[File:Template_storage.png|thumb|none|upright=2.5]] | |||
* In "Network" tab, select a Virtual Network, which the instantiated virtual machine(s) will be connected to. If your template requires more network interfaces, click on "Add another nic" and select it accordingly. | |||
[[File:Template_interface.png|thumb|none|upright=2.5]] | |||
* If a fixed ip address is required, click on "Advanced Option" button and type the fixed address in the "IP" field. | |||
[[File:Template_adv_net_opt.png|thumb|none|upright=2.0]] | |||
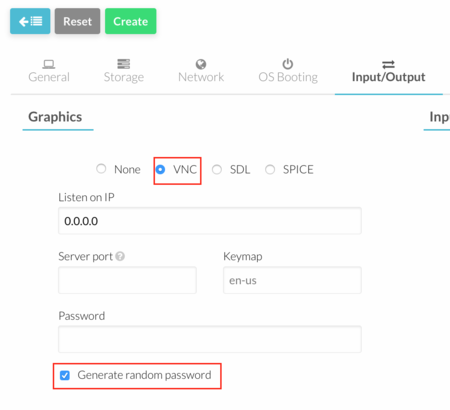
* In "Input/Output" menu, select "VNC" Graphics and tick "Generate Random Password". | |||
[[File: | [[File:Template_vnc.png|thumb|none|upright=1.5]] | ||
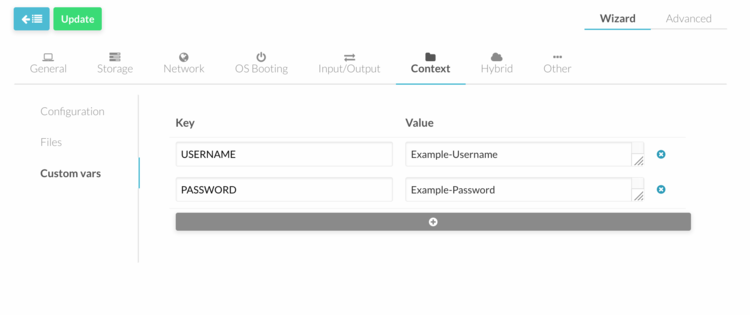
* In "Context" menu, you can define a user account under "Custom Vars". Add the following entries: KEY= USERNAME, VALUE= "your-username", KEY= PASSWORD, VALUE= "your-password" and press "Add" button. | |||
[[File:Template_userpassword.png|thumb|none|upright=2.5]] | |||
The [[Contextualization_of_Windows_VMs|following page]] contains more information regarding the Context section. | |||
==Update a Template== | |||
#[[OpenNebula_Administrative_Functions | Log into OpenNebula Sunstone]]. | |||
#Go to “Templates” in the left menu and click on “VMs” in the drop down menu. | |||
#:[[File:Templates_menu.png|thumb|none|upright=0.5]] | |||
#:<br> | |||
#Click on the template and press "Update" button. | |||
#Make the necessary changes and press the green "Update" button to save. | |||
Latest revision as of 09:24, 25 April 2017
Create a new Template
- Log into OpenNebula Sunstone.
- Go to “Templates” in the left menu and click on “VMs” in the drop down menu.
- Click on the "+" button to create a new template. See below.
- Click "Create" button.
Basic Template for Linux VMs
The basic procedure is as follows:
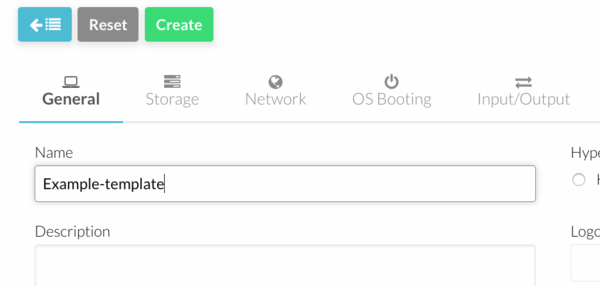
- Add a template name in "General" menu.
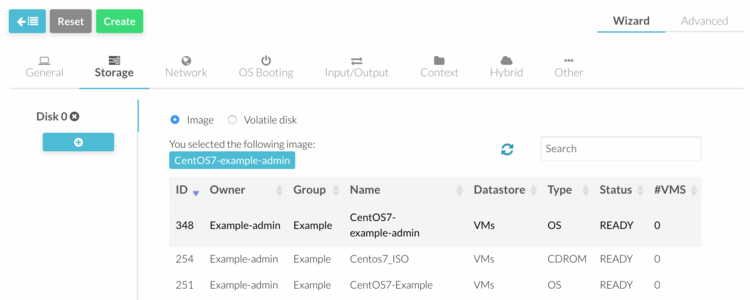
- In "Storage" tab, choose a storage disk. If your template requires more disks, click on "Add another disk" and select it accordingly.
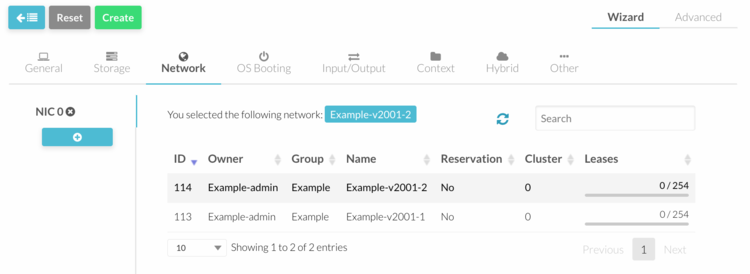
- In "Network" tab, select a Virtual Network, which the instantiated virtual machine(s) will be connected to. If your template requires more network interfaces, click on "Add another nic" and select it accordingly.
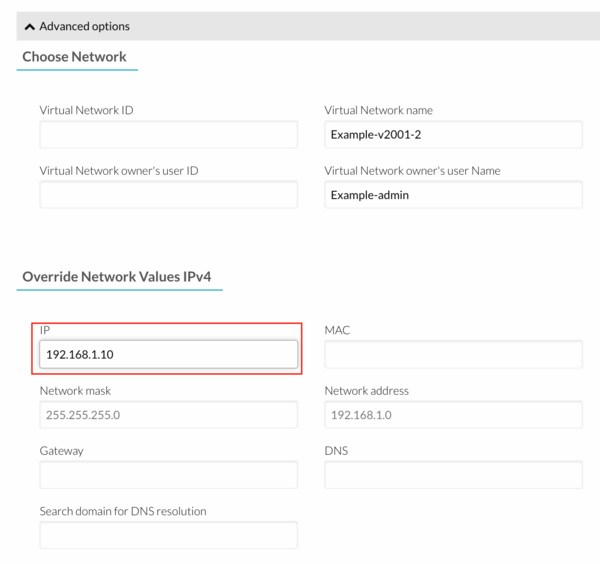
- If a fixed ip address is required, click on "Advanced Option" button and type the fixed address in the "IP" field.
- In "Input/Output" menu, select "VNC" Graphics and tick "Generate Random Password".
- In "Context" menu, add SSH keys in the "Public Key" field and make sure that "Add SSH contextualization" and "Add Network contextualization" are ticked.
- In "Context" menu, you can define a root password under "Custom Vars". Add the following entries: KEY= CRYPTED_PASSWORD_BASE64, VALUE= "password" and press "Add" button.
The following page contains more information regarding the Context section.
Basic Template for Windows VMs
The basic procedure is as follows:
- Add a template name in "General" menu.
- In "Storage" tab, choose a storage disk. If your template requires more disks, click on "Add another disk" and select it accordingly.
- In "Network" tab, select a Virtual Network, which the instantiated virtual machine(s) will be connected to. If your template requires more network interfaces, click on "Add another nic" and select it accordingly.
- If a fixed ip address is required, click on "Advanced Option" button and type the fixed address in the "IP" field.
- In "Input/Output" menu, select "VNC" Graphics and tick "Generate Random Password".
- In "Context" menu, you can define a user account under "Custom Vars". Add the following entries: KEY= USERNAME, VALUE= "your-username", KEY= PASSWORD, VALUE= "your-password" and press "Add" button.
The following page contains more information regarding the Context section.
Update a Template
- Log into OpenNebula Sunstone.
- Go to “Templates” in the left menu and click on “VMs” in the drop down menu.
- Click on the template and press "Update" button.
- Make the necessary changes and press the green "Update" button to save.

