Difference between revisions of "CipherSpace Load Balancer"
| (7 intermediate revisions by 2 users not shown) | |||
| Line 36: | Line 36: | ||
# Click on the "Network" tab | # Click on the "Network" tab | ||
#:[[file:lb_8.png|500px|border]] | #:[[file:lb_8.png|500px|border]] | ||
#:and select a Virtual Network for your NIC (the same network as | #:and select a Virtual Network for your NIC (the same network as the VMs which provide the service you would like to load balance). | ||
#:[[file:lb_9.png|600px|border]] | #:[[file:lb_9.png|600px|border]] | ||
#:<br /> | #:<br /> | ||
#:If your load balancer | #:If clients connect to your load balancer from a different network (Internet for example) you need to add another NIC and attach it to the appropriate Virtual Network. | ||
#:[[file:lb_10.png|600px|border]] | #:[[file:lb_10.png|600px|border]] | ||
#:<br /> | #:<br /> | ||
| Line 50: | Line 50: | ||
#:[[file:lb_13.png|700px|border]] | #:[[file:lb_13.png|700px|border]] | ||
#:<br /> | #:<br /> | ||
# If you have | # If you have 2 NICs, you should set default gateway by adding the variable <code>GATEWAY_IFACE</code>and assign it with the number of the NIC on which requests from clients are coming. (typically <code>1</code>). | ||
#:<code>GATEWAY_IFACE = 1</code> | #:<code>GATEWAY_IFACE = 1</code> | ||
#:<br /> | #:<br /> | ||
| Line 88: | Line 88: | ||
In our example <code>SERVICE_0_LISTEN_PORT</code> has the value <code>80</code> | In our example <code>SERVICE_0_LISTEN_PORT</code> has the value <code>80</code> | ||
The variable <code>SERVICE_X_IP_RANGE</code> <code>=</code> <code>{</code> <code>dotted</code> <code>notation</code> <code>}</code> defines the IP addresses of the backend servers. This variable is '''mandatory'''.<br /> | The variable <code>SERVICE_X_IP_RANGE</code> <code>=</code> <code>{</code> <code>dotted notation</code><code>-</code><code>dotted notation</code><code>}</code> defines the IP addresses of the backend servers. This variable is '''mandatory'''.<br /> | ||
In our example <code> | In our example <code>SERVICE_0_IP_RANGE</code> has the value <code>10.4.0.11-10.4.0.13</code> | ||
The variable <code>SERVICE_X_BACKEND_PORT</code> <code>=</code> <code>{</code> <code>int</code> <code>}</code> defines the TCP port the backend servers are listening to. This variable is optional. If this variable isn't defined, the value of the variable <code>SERVICE_X_LISTEN_PORT</code> will be used instead.<br /> | The variable <code>SERVICE_X_BACKEND_PORT</code> <code>=</code> <code>{</code> <code>int</code> <code>}</code> defines the TCP port the backend servers are listening to. This variable is optional. If this variable isn't defined, the value of the variable <code>SERVICE_X_LISTEN_PORT</code> will be used instead.<br /> | ||
In our example <code> | In our example <code>SERVICE_0_BACKEND_PORT</code> has the value <code>8080</code> | ||
So, our example will be configured as follows: | So, our example will be configured as follows: | ||
| Line 100: | Line 100: | ||
SERVICE_0_IP_RANGE = 10.4.0.11-10.4.0.13 | SERVICE_0_IP_RANGE = 10.4.0.11-10.4.0.13 | ||
SERVICE_0_BACKEND_PORT = 8080</pre> | SERVICE_0_BACKEND_PORT = 8080</pre> | ||
==== Elastic Configuration ==== | |||
Let's assume that we have currently three web servers running (as described in the previous section), but we plan to extend our web servers to a maximum of 50. In this case, we just need to put a wider range in the variable <code>SERVICE_X_IP_RANGE</code> as follows: | |||
<pre> SERVICE_0_IP_RANGE = 10.4.0.11-10.4.0.60</pre> | |||
The load balancer will be then configured to balance the load to these new servers as soon as they are available. | |||
==== Health Checks ==== | ==== Health Checks ==== | ||
| Line 117: | Line 126: | ||
By default, server health check only consist in trying to establish a TCP connection. You can add a complete HTTP request after an established TCP connection by adding the following variable: | By default, server health check only consist in trying to establish a TCP connection. You can add a complete HTTP request after an established TCP connection by adding the following variable: | ||
<code>SERVICE_X_CHECK_URI</code> <code>=</code> <code>{</code> <code> | <code>SERVICE_X_CHECK_URI</code> <code>=</code> <code>{</code> <code><uri></code> <code>}</code> | ||
where <code><uri></code>is the URI referenced in the HTTP requests.<br /> | where <code><uri></code>is the URI referenced in the HTTP requests.<br /> | ||
| Line 180: | Line 189: | ||
Default value is Null. This variable isn't mandatory. | Default value is Null. This variable isn't mandatory. | ||
* <code>SERVICE_X_SSL_OFFLOAD_CERT</code> <code>=</code> <code>{</code> <code>string</code> <code>}</code> defines the certificate chains to offload encrypted connections.<br /> | * <code>SERVICE_X_SSL_OFFLOAD_CERT</code> <code>=</code> <code>{</code> <code>string</code> <code>}</code> defines the certificate chains to offload encrypted connections.<br /> | ||
It has to be a string which contains the following files in PEM format: <code> | It has to be a string which contains the following files in PEM format: <code>certificate</code>, <code>key</code>and <code>intermediate</code>. Order is not important. Default value is Null. This variable isn't mandatory. | ||
* <code>SERVICE_X_REDIRECT_TO_HTTPS</code> <code>=</code> <code>{</code> <code>True</code> <code>}</code> defines the presence of a 301 redirect from http to https.<br /> | * <code>SERVICE_X_REDIRECT_TO_HTTPS</code> <code>=</code> <code>{</code> <code>True</code> <code>}</code> defines the presence of a 301 redirect from http to https.<br /> | ||
Default value is Null. This variable isn't mandatory. | Default value is Null. This variable isn't mandatory. | ||
| Line 203: | Line 212: | ||
# When the new VM is in the <code>RUNNING</code> state, click on the console icon [[file:lb_17.png|25px]] to access the VM. | # When the new VM is in the <code>RUNNING</code> state, click on the console icon [[file:lb_17.png|25px]] to access the VM. | ||
# In the console you will see the login prompt and after a while you will see wether the HAProxy configuration was successful or not. If not, terminate the VM, modify the variables in the template and re-instantiate the VM. | # In the console you will see the login prompt and after a while you will see wether the HAProxy configuration was successful or not. If not, terminate the VM, modify the variables in the template and re-instantiate the VM. | ||
[[file:lb_18.png|700px|border]] | #:[[file:lb_18.png|700px|border]] | ||
#:<br /> | |||
== How to Modify the Load Balancer's Configuration. == | == How to Modify the Load Balancer's Configuration. == | ||
| Line 212: | Line 222: | ||
# Clone the Load Balancer's Template in case you have to roll back. | # Clone the Load Balancer's Template in case you have to roll back. | ||
# Change the configuration in the new template by adding variables, removing variables or modifying existing variables. | # Change the configuration in the new template by adding variables, removing variables or modifying existing variables. | ||
# Terminate the old load balancer VM | # Terminate the old load balancer VM. | ||
# Instantiate the new template again. | # Instantiate the new template again. | ||
Latest revision as of 09:53, 3 August 2017
CipherSpace Load Balancer
The CipherSpace Load Balancer uses HAProxy and its configuration is defined using OpenNebula Contextualization Variables within the appliance's template.
The CipherSpace Load Balancer uses the concept of "sticky sessions", which is a mechanism to route requests from the same source to the same target (if the target is still available).
How to use the CipherSpace Load Balancer
Download the Load Balancer from the App Market
- Go to "Storage" in the left menu and click on "Apps" in the drop down menu.

- A list with all existing apps will appear.
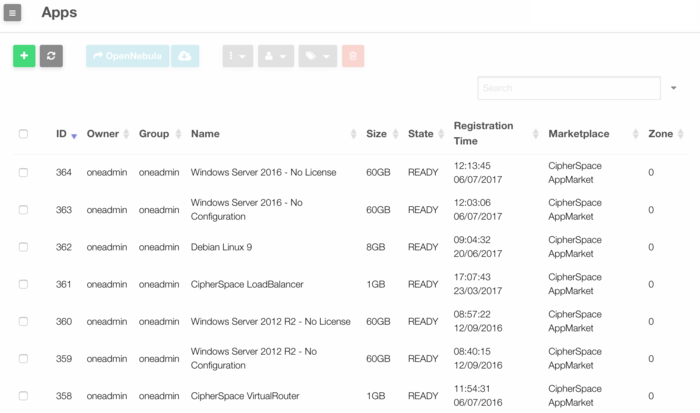
- Select the CipherSpace Load Balancer and click on the "-> OpenNebula" button.
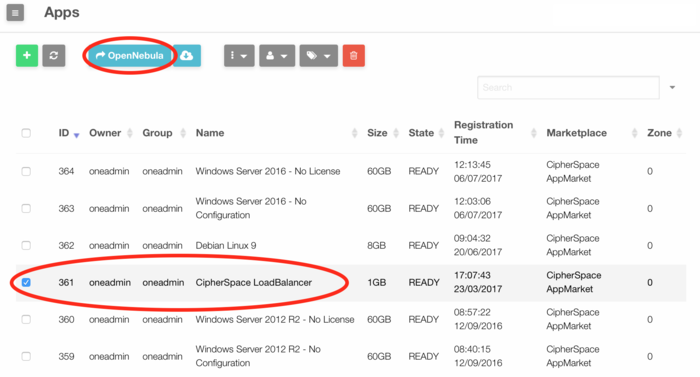
- A new window will appear.

- You can rename the image ("Name") as well as the VM template name. Then select the datastore which is used for your VMs and click on "Download". A new image as well as a new template will be created.


Configure the Load Balancer
- Go to "Templates" in the left menu and click on "VMs" in the drop down menu.
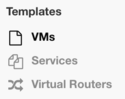
- A list with all existing VM templates will appear.
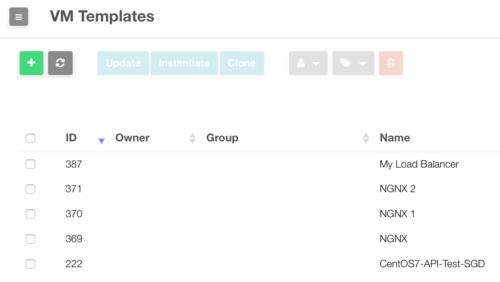
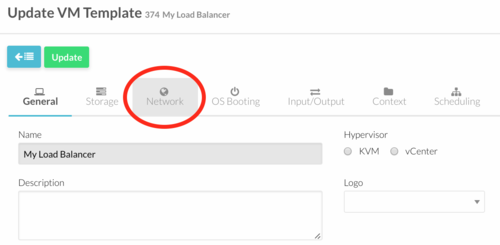
- Select the template for the load balancer and click on "Update".
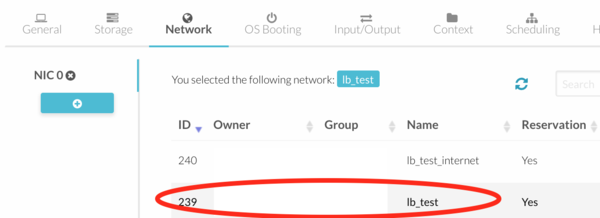
- Click on the "Network" tab
- and select a Virtual Network for your NIC (the same network as the VMs which provide the service you would like to load balance).
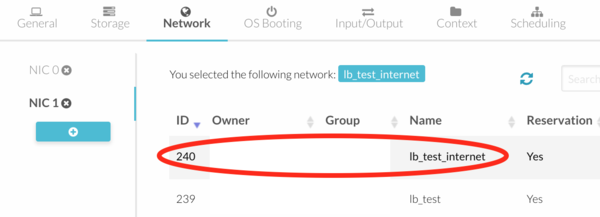
- If clients connect to your load balancer from a different network (Internet for example) you need to add another NIC and attach it to the appropriate Virtual Network.
- Click on the "Context" tab

- and then click on the "Custom vars" section.
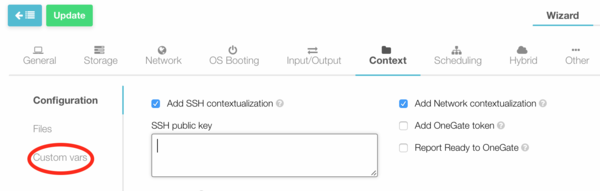
- In the "Custom vars" section, click on the "+" button to enter all the necessary contextualization variables and their respective values (see the section Load Balancer Contextualization Variables).
- If you have 2 NICs, you should set default gateway by adding the variable
GATEWAY_IFACEand assign it with the number of the NIC on which requests from clients are coming. (typically1).GATEWAY_IFACE = 1
- When you're done, click on "Update" to save your changes.


Load Balancer Contextualization Variables
Basic Configuration
In order to understand the contextualization variables, let's use the following example.
You have three web servers and a load balancer attached to the same virtual network. The web servers have the IP addresses 10.4.0.11, 10.4.0.12 and 10.4.0.13 respectively. They listen to http traffic on port 8080. The load balancer listens to http traffic on the port 80.
In this example you only have one service (http) which needs to be balanced.
Every contextualization variable for this service will have a name like SERVICE_0_....
If you define more services, each new service variables will start with
SERVICE_1_, SERVICE_2_, etc..
For this particular example you will define the following variables:
- SERVICE_0_PROTO
- SERVICE_0_LISTEN_PORT
- SERVICE_0_IP_RANGE
- SERVICE_0_BACKEND_PORT
The variable SERVICE_X_PROTO defines the mode in which the service works. Possible modes are:
- http: the instance will work in HTTP mode. The client request will be analyzed in depth before connecting to any server. Any request which is not RFC-compliant will be rejected. Layer 7 filtering, processing and switching will be possible.
- tcp: the instance will work in pure TCP mode. A full-duplex connection will be established between clients and servers, and no layer 7 examination will be performed. It should be used for SSL, SSH, SMTP, ...
In our example SERVICE_0_PROTO has the value HTTP
The variable SERVICE_X_LISTEN_PORT = { int } defines the TCP port the load balancer is listening to.
This variable is mandatory. If this variable isn't defined, the rest of the service definition will be ignored.
In our example SERVICE_0_LISTEN_PORT has the value 80
The variable SERVICE_X_IP_RANGE = { dotted notation-dotted notation} defines the IP addresses of the backend servers. This variable is mandatory.
In our example SERVICE_0_IP_RANGE has the value 10.4.0.11-10.4.0.13
The variable SERVICE_X_BACKEND_PORT = { int } defines the TCP port the backend servers are listening to. This variable is optional. If this variable isn't defined, the value of the variable SERVICE_X_LISTEN_PORT will be used instead.
In our example SERVICE_0_BACKEND_PORT has the value 8080
So, our example will be configured as follows:
   SERVICE_0_PROTO        = HTTP
   SERVICE_0_LISTEN_PORT  = 80
   SERVICE_0_IP_RANGE     = 10.4.0.11-10.4.0.13
   SERVICE_0_BACKEND_PORT = 8080
Elastic Configuration
Let's assume that we have currently three web servers running (as described in the previous section), but we plan to extend our web servers to a maximum of 50. In this case, we just need to put a wider range in the variable SERVICE_X_IP_RANGE as follows:
SERVICE_0_IP_RANGE = 10.4.0.11-10.4.0.60
The load balancer will be then configured to balance the load to these new servers as soon as they are available.
Health Checks
When you use the load balancer, your backend servers are periodically checked if they are available by accepting periodic TCP connections, to ensure that each server is still alive.
Every 2 seconds, each backend server will be checked and its status will be either Up or Down based on the following rules:
- A server is Up after 2 consecutive successful health checks.
- A server is Down after 3 consecutive unsuccessful health checks.
You can change the number of consecutive successful health checks using the variable SERVICE_X_CHECK_RISE and the number of consecutive unsuccessful health checks using the variable SERVICE_X_CHECK_FALL.
Let's use the example defined in the Basic Configuration section. If you want to set the number of successful and unsuccessful checks to 3 and 4 respectively for your backend servers, you will add the following to your configuration:
SERVICE_0_CHECK_RISE = 3
SERVICE_0_CHECK_FALL = 4
By default, server health check only consist in trying to establish a TCP connection. You can add a complete HTTP request after an established TCP connection by adding the following variable:
SERVICE_X_CHECK_URI = { <uri> }
where <uri>is the URI referenced in the HTTP requests.
Responses 2xx and 3xx are considered valid, while all other ones indicate a server failure, including the lack of any response.
HTTPS Support
To enable HTTPS support, you need to specify the following variables like this:
   SERVICE_X_PROTO        = HTTP
   SERVICE_X_LISTEN_PORT  = 443
   SERVICE_X_SSL_OFFLOAD_CERT  = "crt.pem + key.pem + intermediate.pem"
The variable SERVICE_X_SSL_OFFLOAD_CERT = { string } defines the certificate chains to offload encrypted connections.
It has to be a string which contains the certificate, the key and the chain, all in PEM format; the file order is not important.
For instance let's assume you are using Let's Encrypt certificates, you will concatenate the two files privkey.pem and fullchain.pem as follows:
- In Linux (or in MacOS via terminal):
cat privkey.pem fullchain.pem - In Windows (via command prompt):
type privkex.pem fullchain.pem
Then copy the result and paste it in the Value field.
If you need to redirect your HTTP traffic to HTTPS, you will assign the variable SERVICE_X_REDIRECT_TO_HTTPS as follows:
SERVICE_X_REDIRECT_TO_HTTPS = True
You can also define the maximum age of your HTTP Strict Transport Security (HSTS) by assigning the variable SERVICE_X_SSL_HSTS_MAX_AGE as follows:
SERVICE_X_SSL_HSTS_MAX_AGE = 15768000 #corresponds to 6 months
The variable SERVICE_X_SSL_HSTS_MAX_AGE = { int } defines the HSTS policy maximum age in seconds. In our example 15768000 seconds correspond to approximatively 6 months.
All Variables
This sections list all available contextualization variables. Their name is composed as follows:
- SERVICE_X_ (where X is a number >= 0) defines the load balancing service to be configured;
- Keyword defines the corresponding service item to be configured.
Some variables are valid for both protocols (tcp and http) and some are valid only with protocol http.
TCP and HTTP Variables
MAXCONN={int}defines the value of themaxconnparameter, which sets the maximum per-process number of concurrent connections. Proxies will stop accepting connections when this limit is reached.
The default value is 2000. This variable isn't mandatory.
SERVICE_X_PROTO={tcp|http}defines the protocol in service numberX.
Default value is http. This variable isn't mandatory.
SERVICE_X_LISTEN_PORT={int}defines the TCP port the load balancer is listening.
Default value is Null. This variable is mandatory.
If this variable isn't defined, the rest of the service definition will be ignored.
SERVICE_X_IP_RANGE={dottednotation}defines the IP addresses of backend server(s).
Default value is Null. This variable is mandatory.
Example: SERVICE_X_IP_RANGE = { 10.4.0.2-10.4.0.20 }
SERVICE_X_BACKEND_PORT={int}defines TCP port on which backend server(s) are listening.
Default value is Null. This variable isn't mandatory.
NOTE if the variable isn't defined, it will take the SERVICE_X_LISTEN_PORT value.
SERVICE_X_CHECK_RISE={int}defines the number of consecutive successful health checks that declare the backend server is alive.
Default value is 2. This variable isn't mandatory.
SERVICE_X_CHECK_FALL={int}defines the number of consecutive unsuccessful health checks that declare the backend server is dead.
Default value is 3. This variable isn't mandatory.
HTTP only Variables
SERVICE_X_CHECK_URI={string}defines the URI referenced in the HTTP health-check.
Default value is Null. This variable isn't mandatory.
SERVICE_X_SSL_OFFLOAD_CERT={string}defines the certificate chains to offload encrypted connections.
It has to be a string which contains the following files in PEM format: certificate, keyand intermediate. Order is not important. Default value is Null. This variable isn't mandatory.
SERVICE_X_REDIRECT_TO_HTTPS={True}defines the presence of a 301 redirect from http to https.
Default value is Null. This variable isn't mandatory.
SERVICE_X_SSL_HSTS_MAX_AGE={int}defines the HSTS policy max-age in seconds.
Default value is Null. This variable isn't mandatory.
Default Null value means that the related configuration is not applied if the variable isn't defined.
Start and Check the Load Balancer
- Go to "Templates" in the left menu and click on "VMs" in the drop down menu.
- A list with all existing VM templates will appear.
- Select the configured load balancer template and click on "Instantiate".
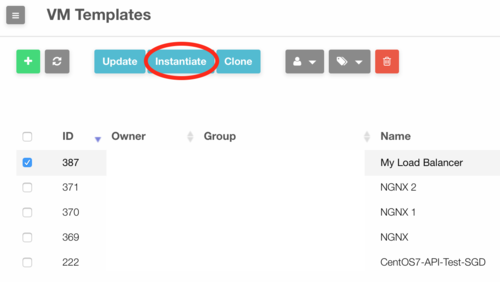
- A new window will appear

- You can assign a name to your load balancer or leave the field empty. Click on "Instantiate" to start the instantiation.
- When the new VM is in the
RUNNINGstate, click on the console icon to access the VM.
 - In the console you will see the login prompt and after a while you will see wether the HAProxy configuration was successful or not. If not, terminate the VM, modify the variables in the template and re-instantiate the VM.


How to Modify the Load Balancer's Configuration.
Currently you cannot modify the load balancer's configuration while it is running. Also if you were to modify the HAProxy configuration within the load balancer VM, if the VM had to be terminated and re-instantiated, you would loose your modifications.
In order to minimize the downtime, you should:
- Clone the Load Balancer's Template in case you have to roll back.
- Change the configuration in the new template by adding variables, removing variables or modifying existing variables.
- Terminate the old load balancer VM.
- Instantiate the new template again.
Appendix
Dissecting HAProxy's configuration
HAProxy configuration consists of several sections:
- the
globalsection, which sets process-wide parameters (static, cannot be modified), - and for each defined service, a
proxysection, which is built using the contextualization variables.
Global Section
Global section is standardized for every appliance as follows:
global
    log         127.0.0.1 local2
    chroot      /var/lib/haproxy
    pidfile     /var/run/haproxy.pid
    # set default parameters to the intermediate configuration
    tune.ssl.default-dh-param 2048
    ssl-default-bind-ciphers ECDHE-ECDSA-CHACHA20-POLY1305:ECDHE-RSA-CHACHA20-POLY1305:ECDHE-ECDSA-AES128-GCM-SHA256:ECDHE-RSA-AES128-GCM-SHA256:ECDHE-ECDSA-AES256-GCM-SHA384:ECDHE-RSA-AES256-GCM-SHA384:DHE-RSA-AES128-GCM-SHA256:DHE-RSA-AES256-GCM-SHA384:ECDHE-ECDSA-AES128-SHA256:ECDHE-RSA-AES128-SHA256:ECDHE-ECDSA-AES128-SHA:ECDHE-RSA-AES256-SHA384:ECDHE-RSA-AES128-SHA:ECDHE-ECDSA-AES256-SHA384:ECDHE-ECDSA-AES256-SHA:ECDHE-RSA-AES256-SHA:DHE-RSA-AES128-SHA256:DHE-RSA-AES128-SHA:DHE-RSA-AES256-SHA256:DHE-RSA-AES256-SHA:ECDHE-ECDSA-DES-CBC3-SHA:ECDHE-RSA-DES-CBC3-SHA:EDH-RSA-DES-CBC3-SHA:AES128-GCM-SHA256:AES256-GCM-SHA384:AES128-SHA256:AES256-SHA256:AES128-SHA:AES256-SHA:DES-CBC3-SHA:!DSS
    ssl-default-bind-options no-sslv3 no-tls-tickets
    ssl-default-server-ciphers ECDHE-ECDSA-CHACHA20-POLY1305:ECDHE-RSA-CHACHA20-POLY1305:ECDHE-ECDSA-AES128-GCM-SHA256:ECDHE-RSA-AES128-GCM-SHA256:ECDHE-ECDSA-AES256-GCM-SHA384:ECDHE-RSA-AES256-GCM-SHA384:DHE-RSA-AES128-GCM-SHA256:DHE-RSA-AES256-GCM-SHA384:ECDHE-ECDSA-AES128-SHA256:ECDHE-RSA-AES128-SHA256:ECDHE-ECDSA-AES128-SHA:ECDHE-RSA-AES256-SHA384:ECDHE-RSA-AES128-SHA:ECDHE-ECDSA-AES256-SHA384:ECDHE-ECDSA-AES256-SHA:ECDHE-RSA-AES256-SHA:DHE-RSA-AES128-SHA256:DHE-RSA-AES128-SHA:DHE-RSA-AES256-SHA256:DHE-RSA-AES256-SHA:ECDHE-ECDSA-DES-CBC3-SHA:ECDHE-RSA-DES-CBC3-SHA:EDH-RSA-DES-CBC3-SHA:AES128-GCM-SHA256:AES256-GCM-SHA384:AES128-SHA256:AES256-SHA256:AES128-SHA:AES256-SHA:DES-CBC3-SHA:!DSS
    ssl-default-server-options no-sslv3 no-tls-tickets
    user        haproxy
    group       haproxy
    daemon
    maxconn     2000
Parameter maxconn sets the maximum per-process number of concurrent connections. Proxies will stop accepting connections when this limit is reached. For further information see this page. This parameter can be modified using a contextualization variable.
Proxy Section
In HAProxy, the Proxy configuration for each service contains a set of sections, which can be either:
- defaults [<name>]
- frontend <name>
- backend <name>
Or:
- defaults [<name>]
- listen <name>
A defaults section sets default parameters for all other sections following its declaration. Those default parameters are reset by the next defaults section.
A frontend section describes a set of listening sockets accepting client connections.
A backend section describes a set of servers to which the proxy will connect to forward incoming connections.
A listen section defines a complete proxy with its frontend and backend parts combined in one section. It is generally useful for TCP-only traffic.
For the CipherSpace Load Balancer, we use only one defaults section, valid for all services. We also don't use the listen section, as it can be replaced with one frontendand one backend section.
Right now, two major proxy modes are supported: tcp, also known as layer 4, and http, also known as layer 7.
In layer 4 mode, HAProxy simply forwards bidirectional traffic between two sides.
In layer 7 mode, HAProxy analyzes the protocol, and can interact with it by allowing, blocking, switching, adding, modifying, or removing arbitrary contents in requests or responses, based on arbitrary criteria.
Defaults Section
The defaults section is standardized for every appliance as follows:
  defaults
     log                     global
     option                  redispatch
     retries                 3
     timeout http-request    10s
     timeout queue           1m
     timeout connect         10s
     timeout client          1m
     timeout server          1m
     timeout http-keep-alive 10s
     timeout check           10s
Frontend and Backend Sections
The frontendand backendsections are configured using the contextualization variables defined in the section All Variables.
Variable SERVICE_X_PROTO defines the mode in which the service works. Possible modes are:
- http: the instance will work in HTTP mode. The client request will be analyzed in depth before connecting to any server. Any request which is not RFC-compliant will be rejected. Layer 7 filtering, processing and switching will be possible.
- tcp: the instance will work in pure TCP mode. A full-duplex connection will be established between clients and servers, and no layer 7 examination will be performed. This is the default mode. It should be used for SSL, SSH, SMTP, ...
When SERVICE_X_PROTO = http, the service is defined in mode http and the script generates the following configuration:
  [...]
  frontend service_X
    mode http
    option                  httplog
    option http-server-close
    option forwardfor       except 127.0.0.0/8
    [...]

  backend service_X_backend
    mode http
    balance source
    [...]
When SERVICE_X_PROTO = tcp, the service is defined in mode tcp and the script generates the following configuration:
   [...]
   frontend service_X
     mode tcp
     option                  tcplog
     [...]

   backend service_X_backend
     mode tcp
     balance source
     [...]
Example:
In the following example, we define the following contextualization variables:
   SERVICE_0_PROTO        = http
   SERVICE_0_LISTEN_PORT  = 80
   SERVICE_0_IP_RANGE     = 10.4.0.5 - 10.4.0.10
   SERVICE_0_BACKEND_PORT = 8080
Those variables generate the following complete HAProxy's configuration:
   global
      log         127.0.0.1 local2
      chroot      /var/lib/haproxy
      pidfile     /var/run/haproxy.pid
      # set default parameters to the intermediate configuration
      tune.ssl.default-dh-param 2048
      ssl-default-bind-ciphers       ECDHE-ECDSA-CHACHA20-POLY1305:ECDHE-RSA-CHACHA20-POLY1305:ECDHE-ECDSA-AES128-GCM-SHA256:ECDHE-RSA-AES128-GCM-SHA256:ECDHE-ECDSA-AES256-GCM-SHA384:ECDHE-RSA-AES256-GCM-SHA84:DHE-RSA-AES128-GCM-SHA256:DHE-RSA-AES256-GCM-SHA384:ECDHE-ECDSA-AES128-SHA256:ECDHE-RSA-AES128-SHA256:ECDHE-ECDSA-AES128-SHA:ECDHE-RSA-AES256-SHA384:ECDHE-RSA-AES128-SHA:ECDHEECDSA-AES256-SHA384:ECDHE-ECDSA-AES256-SHA:ECDHE-RSA-AES256-SHA:DHE-RSA-AES128-SHA256:DHE-RSA-AES128-SHA:DHE-RSA-AES256-SHA256:DHE-RSA-AES256-SHA:ECDHE-ECDSA-DES-CBC3-SHA:ECDHE-RA-DES-CB       C3-SHA:EDH-RSA-DES-CBC3-SHA:AES128-GCM-SHA256:AES256-GCM-SHA384:AES128-SHA256:AES256-SHA256:AES128-SHA:AES256-SHA:DES-CBC3-SHA:!DSS
      ssl-default-bind-options no-sslv3 no-tls-tickets
      ssl-default-server-ciphers       ECDHE-ECDSA-CHACHA20-POLY1305:ECDHE-RSA-CHACHA20-POLY1305:ECDHE-ECDSA-AES128-GCM-SHA256:ECDHE-RSA-AES128-GCM-SHA256:ECDHE-ECDSA-AES256-GCM-SHA384:ECDHE-RSA-AES256-GCM-SHA84:DHE-R      SA-AES128-GCM-SHA256:DHE-RSA-AES256-GCM-SHA384:ECDHE-ECDSA-AES128-SHA256:ECDHE-RSA-AES128-SHA256:ECDHE-ECDSA-AES128-SHA:ECDHE-RSA-AES256-SHA384:ECDHE-RSA-AES128-SHA:ECDHEECDSA-AE      S256-SHA384:ECDHE-ECDSA-AES256-SHA:ECDHE-RSA-AES256-SHA:DHE-RSA-AES128-SHA256:DHE-RSA-AES128-SHA:DHE-RSA-AES256-SHA256:DHE-RSA-AES256-SHA:ECDHE-ECDSA-DES-CBC3-SHA:ECDHE-RA-DES-CB       C3-SHA:EDH-RSA-DES-CBC3-SHA:AES128-GCM-SHA256:AES256-GCM-SHA384:AES128-SHA256:AES256-SHA256:AES128-SHA:AES256-SHA:DES-CBC3-SHA:!DSS
      ssl-default-server-options no-sslv3 no-tls-tickets
      user        haproxy
      group       haproxy
      daemon
      maxconn     2000

   defaults
      log                     global
      option                  redispatch
      retries                 3
      timeout http-request    10s
      timeout queue           1m
      timeout connect         10s
      timeout client          1m
      timeout server          1m
      timeout http-keep-alive 10s
      timeout check           10s
      maxconn                 3000

   frontend service_0
      mode http
      option                  httplog
      option http-server-close
      option forwardfor       except 127.0.0.0/8
      bind :80
      default_backend service_0_backend

   backend service_0_backend
      mode http
      balance source
      server server0 10.4.0.5:8080 check
      server server1 10.4.0.6:8080 check
      server server2 10.4.0.7:8080 check
      server server3 10.4.0.8:8080 check
      server server4 10.4.0.9:8080 check
      server server5 10.4.0.10:8080 check
Health Checks
When a server is defined in the backend section, it is possible to define a health check using the setting check.
By default, a server is always considered available. If check is set, the server is available when it is accepting periodic TCP connections, to ensure that it is really able to serve requests.
The default address and port for these tests are those of the server, and the default source is the same as the one defined in the backend.
It is possible to change the port using the port parameter (currently not implemented), and the interval (currently not implemented) and timers using the inter, rise and fall parameters.
The inter default value of 2000 ms between two consecutive health checks is good enough.
rise <count>
The rise parameter states that a server will be considered as operational after <count> consecutive successful health checks. This value defaults to 2 if unspecified.
fall <count>
The fall parameter states that a server will be considered as dead after <count> consecutive unsuccessful health checks. This value defaults to 3 if unspecified.
The request method is defined in the backend using the option httpchk. The option httpchk enables HTTP protocol to check on the servers health.
Possible configuration are:
option httpchk <uri>
Arguments are:
<uri>: is the URI referenced in the HTTP requests. It defaults to "/" which is accessible by default on almost any server, but may be changed to any other URI. Query strings are permitted.
By default, server health checks only consist in trying to establish a TCP connection. When option httpchk is specified, a complete HTTP request is sent once the TCP connection is established, and responses 2xx and 3xx are considered valid, while all other ones indicate a server failure, including the lack of any response.
The port and interval are specified in the server configuration.
This option does not necessarily require an HTTP backend, it also works with plain TCP backend.
Example:
In the following example, we define the following contextualization variables:
[...]
SERVICE_0_CHECK_URI  = "/"
SERVICE_0_CHECK_RISE = 3
SERVICE_0_CHECK_FALL = 4
Those variables generate the following HAProxy's configuration:
[...]
backend service_0_backend
   mode http
   option httpchk /
   balance source
   server server0 10.4.0.5:8080 check rise 3 fall 4
   server server1 10.4.0.6:8080 check rise 3 fall 4
   server server2 10.4.0.7:8080 check rise 3 fall 4
   server server3 10.4.0.8:8080 check rise 3 fall 4
   server server4 10.4.0.9:8080 check rise 3 fall 4
   server server5 10.4.0.10:8080 check rise 3 fall 4
HTTPS Support
To enable https support, we need to specify in the frontend section the option ssl and the option crt followed by path to the file which contains certificate, privkey, intermediate certificate and dhparam.
Example:
In the following example, we define the following contextualization variables:
[...]
SERVICE_X_SSL_OFFLOAD_CERT  = "crt.pem + key.pem + intermediate.pem";
SERVICE_X_REDIRECT_TO_HTTPS = True
SERVICE_X_SSL_HSTS_MAX_AGE  = 15768000
Those variables generate the following HAProxy's configuration:
frontend service_0
  mode    http
  bind    :443 ssl crt /path/to/<cert+privkey+intermediate+dhparam>
  bind    :80
  redirect scheme https code 301 if !{ ssl_fc }

  # HSTS (15768000 seconds = 6 months)
  http-response set-header Strict-Transport-Security max-age=15768000
<Category:OpenNebula>